Layering is the term used when we grow new roots on the stem of a plant so that we can produce a new plant.
There are 2 main methods: Air layering and Ground layering. There are also many variations of each of these methods.
Layering has many uses in bonsai:
- It can be used to propagate a new plant that you can then train as a bonsai. Because you can layer large branches you can start off with a nice thick trunk.
- It can be used to grow new roots at a point on the trunk that is better than the current root level.
- If a bonsai has poor nebari, a modified version of layering can be used to get new roots to fill in, and improve the nebari.
- When you have a bonsai with a really nice top but poor base you can layer and remove the good upper part as a new tree.
Layering relies on injuring the cambium layer then providing a damp medium around the injured area. As the cambium forms callus to heal itself there is a tendency for the callus to develop roots if it is in a damp environment. Because the layer remains on the parent it is provided with food and water as usual and should stay alive for many months while new roots form.
First, propagating a new plant by layering:

make 2 cuts around the branch
I usually use the ringbark method for layering. Cut through the bark all the way round the stem where you want roots to grow. Make a matching cut several centimetres below the first then join the cuts with another vertical cut.
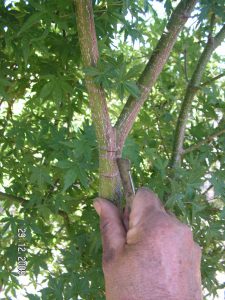
vertical cut
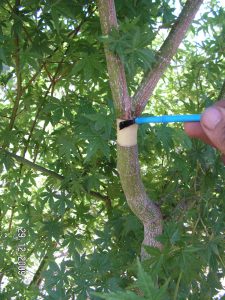
Now peel off the bark between the 2 initial cuts. In spring and summer the bark will usually slip of easily. If you are layering in winter or when the plant is dormant the bark will not slip easily and you’ll need to scrape every bit off with a knife. At this stage it is best to scrape the bare wood again to remove as much remaining cambium as possible. If the cambium is left there is a tendency for it to bridge the gap without forming roots.
At this stage many bonsai growers use one of the many modifications to standard layering – wrap a loop of copper wire around the stem just below the upper cut and twist the ends to make a tight ring around the stem. This will prevent the cambium from healing the gap and encourage roots to form.
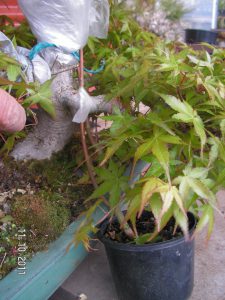
Rooting compound is not essential but wiping some onto the cut area does seem to help roots form. You can use powder, liquid or gel forms of the rooting hormones. Apply with a small brush as shown above.
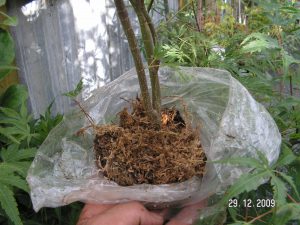
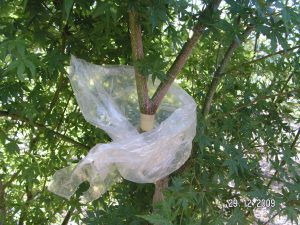 Wrap a handful of damp sphagnum moss around the wounded area and wrap the entire area with plastic wrap to hold the moss in place and to reduce evaporation. It can be difficult to hold moss and plastic in place while tying the bundle together so in practice I usually wrap plastic around the wounded area then tie the lower end. Open the top of your plastic wrap and pack the bag with sphagnum moss to cover the wounded area then tie the top closed.
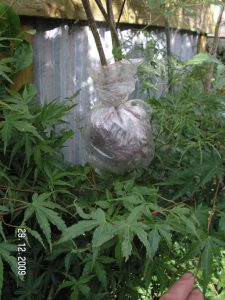
As a bonsai grower I usually have copper wire on hand so I use that to tie the plastic but you can use anything that works.
The moss must stay damp but not soggy. Check weekly and add water if necessary.
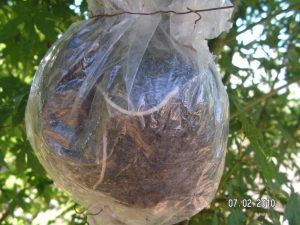
Roots take anywhere between 3 weeks and 3 months to form on most plants. If you’ve used clear plastic to wrap your layer you will be able to see the new roots as they reach the plastic layer but you can gently open the top and check on progress if required.
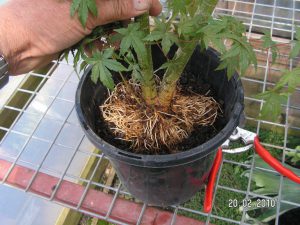
When you can see plenty of healthy roots the newly rooted plant can be cut off the parent and planted in a pot. You may need to tie the new plant into the pot to prevent it moving around and injuring the tender new roots.
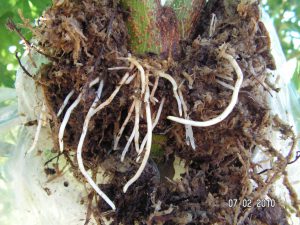
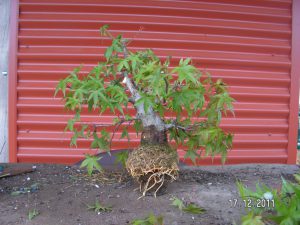
This one survived with just these few small roots
The amount of new roots needed for your layer to survive will depend on the size, time of year and other factors. I have been amazed at how few roots it actually takes to sustain a newly severed layer but if you are concerned just leave it in place for a few more weeks until the roots have grown a but more.
This one has plenty of roots
There’s no need to remove the sphagnum moss at this stage but if some falls out while you are preparing for potting that does not matter.
I like to leave newly layered plants for 6-12 months (remember to feed and water well so they stay healthy and grow strong) before unpotting to remove any remaining moss and beginning the root pruning process to create a good, lateral root system for bonsai.
Some growers find that moss can keep the area a bit too wet or the process of applying moss and plastic wrap is too fiddly so they prefer to use split pots filled with potting mix around the layering site. This method relies on regular watering to maintain moisture in the potting mix and is best used where you can tend to the layer daily. Select a suitable sized pot. Cut down one side and across the bottom to the centre. Cut a circle out of the bottom of the pot to match the size of the branch you are layering. Open the pot enough to slip it around the layering site then tie it closed around the branch with wire, string or duct tape then fill with potting mix to cover the wound. If your pot shows a tendency to slip down the branch you may need to tie it in place with more wire or tape.
It is more difficult to use a split pot if the branch you are layering is horizontal.
It is tempting to place layers on straight, bare parts of branches or trunks because it is easier to work but who wants a bonsai with a straight trunk? If you are going to all the trouble to grow a new tree for bonsai you might as well find a place which will yield a really good trunk so look for places where the branch has bends or twists and plenty of smaller side branches that will give options for good branches on the resulting bonsai. Layering just below the fork in a branch will give you a twin or multi trunk bonsai.
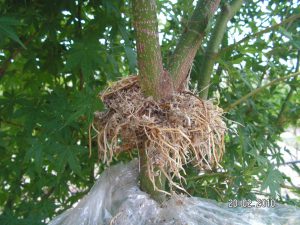
 You can also use layering to improve existing bonsai. If the trunk of your bonsai is too long or has unsightly bulges it would look so much better if the roots were further up the trunk. No problem. Just layer the trunk where you want the roots. These pictures show an old Japanese maple that had these problems. It would have been almost impossible to improve the tree as it was so I air layered a couple of good branches and the upper part of the trunk to create better new bonsai.
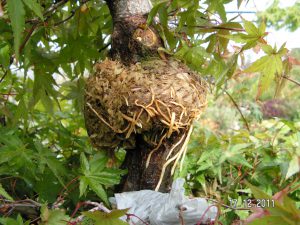
You can see 2 of the wrapped layers in the first picture and the resulting roots on the trunk in the second picture.
Here is the final result. An already aged Japanese maple with a short, well tapered trunk and roots at the widest part. A vast improvement on the tree before. Even better, the lower trunk and branch is still alive and can be used for another different bonsai.
Ground layering is often shown in gardening books as bending a lower branch down to soil level and pegging it down so that roots can form in the soil beside the parent plant. That’s fine if you just want to propagate a new plant but there are several modifications to this method that are far more valuable to bonsai growers.
- You can use the ringbark method outlined above or any other method to wound the cambium. If there’s enough room you could even wrap the area in moss and plastic but if the layer is closer to the soil there won’t be enough room to tie the plastic wrap. In that case just raise the soil level to cover the wounded area and roots will grow straight into the potting mix. A cylinder of mesh or rigid plastic (cut down plastic pots are ideal) can be used to contain the new potting mix at the higher level.
- The existing roots are in the right place but there are gaps or roots only on one side. In this case you can make a partial layer. Just remove bark from the areas where you want new roots, apply rooting hormone then cover the wounds with more potting mix. A variation on this uses holes drilled through the bark to provide the wounds where roots are wanted. Matchsticks or wooden tooth picks coated with rooting hormone are then inserted into the holes and left in place. the hormone helps to stimulate new roots and the matchstick stops the hole from healing up, making roots more likely.
I cannot find any of my photos to illustrate these techniques to post here but here’s a link to an Ausbonsai thread showing root grafting followed by partial ground layer to improve the nebari on a couple of my trident maples. New roots to enhance nebari – Ausbonsai
Here is an ausbonsai thread showing pictures of the ‘tooth pick’ method to induce roots around the trunk of a bonsai – tooth pick method – Ausbonsai